As an Amazon Associate we earn from qualifying purchases. Some brands also pay us when you click or buy, so those links are ads. Full disclosure below
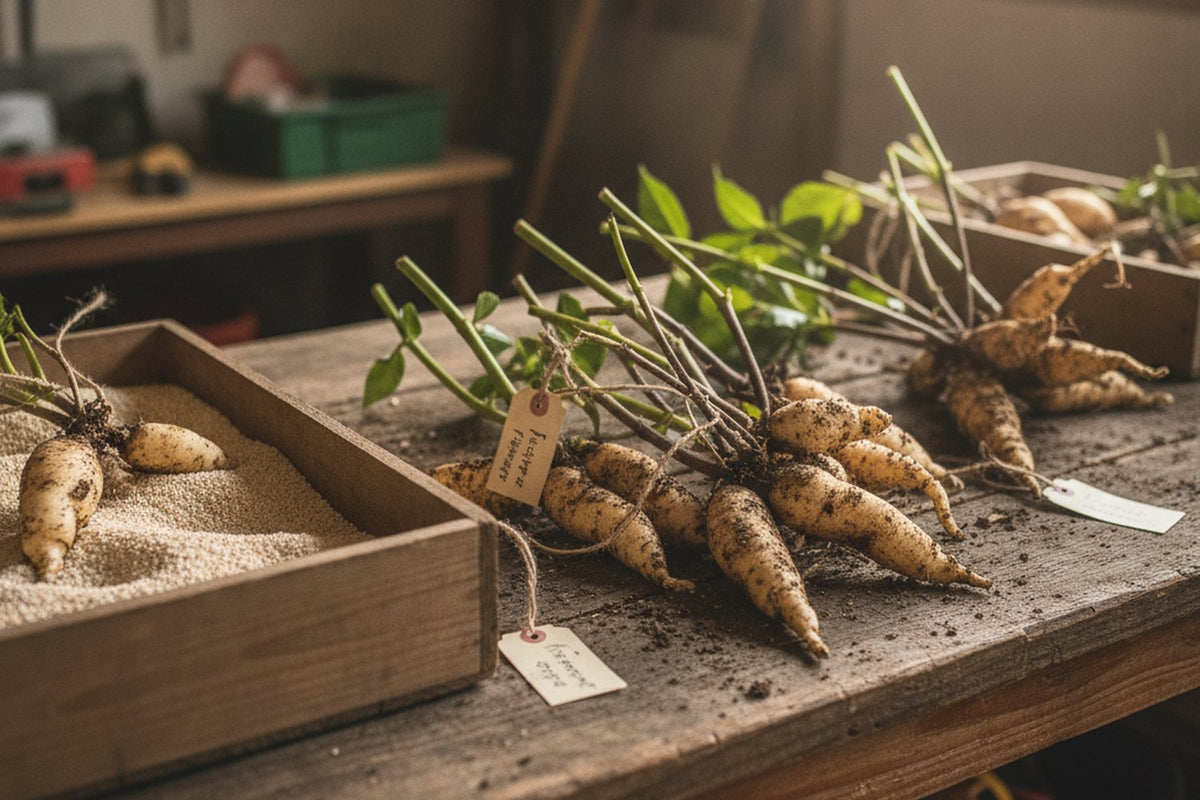
To store dahlia tubers over winter, dig the clumps after the first frost blackens the foliage, wash and divide them (or keep the clump whole), and let the pieces dry for a day or two off any concrete floor. Then pack them in a barely damp medium such as coarse vermiculite or wood shavings, or wrap them in plastic wrap. Keep them dark, cool and above freezing, about 40 to 45 degrees F, and open them once a month to pull anything rotting and mist anything shriveling. The American Dahlia Society's digging and storing article, by Alan Fisher, says good, mature roots from healthy plants generally keep well, with 90 to 95 percent success from any of several storage methods.
Dahlia growers argue about almost every detail: which medium, open or closed bags, how humid, and whether to divide in fall or spring. Every step here comes from the dahlia society, extension services and growers we name and link; where they disagree, we show both sides and say which way we lean. We did not test the methods ourselves. Lifting dahlias is one job on our fall garden checklist; this guide is the whole job.
Do you have to dig up dahlias?
Only where the ground freezes deep enough to reach them. Swan Island Dahlias says that if the freeze reaches a depth of 4 to 6 inches or more, leaving them in the ground is not an option, because a frozen tuber will not be viable again, and NC State Extension says the tuberous roots can be injured at temperatures below 25 degrees F. The sources put the hardiness line in slightly different places:
| Source | Can stay in the ground | Must be dug and stored |
|---|---|---|
| Oregon State University Extension | USDA Zone 7 or above | Colder zones |
| WSU Extension (Yakima) | Zones 8 and warmer; many Zone 7 gardeners succeed with extra protection | Colder climates |
| Longfield Gardens | Zones 8 through 11 may work, with a thick layer of mulch | Zones 3 through 7 |
| Cornell Cooperative Extension | Zone 8 and warmer | New York |
| NC State Extension | Zones 7 to 10, mulched over | Zones below 7 |
Zone 7 is where they split, and NC State's own plant page also says to harvest in Zone 7 and just mulch in Zone 8. Treat Zone 7 as a gamble.
To leave them in, Oregon State says the bed must drain well with no standing water. Cut the stems to ground level after the first frost, cover the bed with a sheet of 6-mil black plastic and at least 4 inches of organic mulch or leaves, and uncover in spring when there is no threat of frost. Oregon State warns that voles and gophers sometimes eat them, and says to dig and divide overwintered clumps every three years. Swan Island says to move dahlias in containers somewhere they will not freeze, or dig them, and to dig and store dahlias in raised beds.
When to dig up dahlias
Most sources say after frost blackens the foliage, then a short wait. The American Dahlia Society says the roots do not mature until late in the season and keep maturing after light frosts, and the longer they stay in the ground, the better they are likely to keep. Swan Island warns that tubers dug too early have not hardened off and will not store well, and digs 2 weeks after a killing frost or after November 15, whichever comes first.
Frost itself is not required: Penn State Extension Master Gardener Mary Niezelski writes that dahlias need at least 120 days in the ground to produce mature tubers and that it is unnecessary to wait for frost. Do not wait for the ground to freeze, though. Oregon State says dahlias can handle rain but will rot if the ground freezes, and Longfield says it is fine to dig sooner when a deep freeze or heavy, sustained rain is forecast.
How to dig, divide and store dahlia tubers, step by step
Have this ready: a storage medium, plastic bags or a bin, a sharp knife, bleach for cleaning it, and a marker. The American Dahlia Society's short guide for beginners figures on processing around six plants an hour, so plan a manageable number per day.
- Before the frost: label every plant (step 1).
- After a hard frost: cut the stalks to about 4 to 6 inches (step 2).
- Three to seven days later (the same day if a freeze is coming): dig, wash, divide and check for rot (steps 3 to 6).
- Over the next day or two: dry, mark and pack (steps 7 and 8), then store and check monthly (steps 9 and 10).
1. Label every plant before the frost
Check that every plant carries its variety name before frost cuts it down, because afterward they all look the same. The American Dahlia Society says to keep the tag with the clump at all times, since unmarked tubers are worth a lot less. WSU's Carol Barany ties plastic flagging tape to the base of each clump while it is still blooming and records the variety name, so the clump comes out of the ground already labeled.
Skip any plant that was weak, bloomed poorly or showed signs of virus, the society says; University of Kentucky extension professor Rick Durham lists streaked or mottled foliage, distorted leaves or flowers, and stunted growth as symptoms. Trash the tops rather than composting them: the society's beginner guide says they can carry virus and insect and mite eggs that survive composting.
2. Cut the stalks a few days before you dig
After a hard frost, cut the stalks down to about 4 to 6 inches above the ground and, if no freeze is forecast, leave the clumps in the soil for three to seven days before you dig. Oregon State says the wait gives the eyes (the buds that become next year's shoots) a chance to show, which makes dividing easier; if a freeze is in the forecast, Oregon State says you can dig the same day you cut. Leave enough stalk to handle the clump once it is out, but do not pull it out of the ground by the stalk (step 3).
Keep water out of the cut stems: the American Dahlia Society says it can promote crown rot, and covers each cut stalk with aluminum foil. Its virus research found that cutting tools spread virus from plant to plant, so dip them in a solution of one part bleach to ten parts water between plants, now and when you divide.
3. Dig a wide circle and lift the clump from underneath
Dig all the way around the plant, well away from the stalk, then work your tool under the clump and lift it. The American Dahlia Society digs on all four sides about a foot from the main stalk; Oregon State says to dig about 18 inches out to avoid damaging tubers. Longfield Gardens stays at least 12 inches away and says never to pull the clump out by its stalk, because the neck, where each tuber joins the stem, is the fragile part: a broken neck means the tuber usually will not grow.
A spade or a fork both work. The University of Wisconsin, in its tender-bulb storage guide, says a digging fork is less likely than a shovel to cause injury. Whichever you use, what the sources agree on is the distance from the stalk and lifting from underneath. If the clump resists, Longfield says not to force it; clear more soil away. Once it is out, turn it upside down to drain water from the stem, as the society and the University of Kentucky advise. For work on your knees, see our garden kneeler guide.
4. Wash the clump, unless you are storing it whole
Hose off the soil if you plan to divide or quarter the clump now (step 5). The American Dahlia Society washes each clump with a garden hose because dirt carries microorganisms you do not want in storage, and Oregon State says to use a stream strong enough to wash but not so strong that it damages the skin, since damaged skin keeps worse.
Not everyone washes. NC State says not to, and Ohio State's Erie County Master Gardeners let the clumps dry for a few hours before rinsing. If you will store the clump whole and divide in spring, Oregon State says not to wash it; knock off the loose soil and let it air dry for a few days.
5. Divide now, or store the clump whole
Divide in fall if you can; it is easier to cut and saves space, though the eyes are harder to find. The American Dahlia Society says some varieties get so hard over winter that you would need a power saw to separate them in spring, and the University of Kentucky and Penn State agree that fall clumps cut more easily. The cost is that you may cut some tubers with no eye at all, which Penn State's Niezelski calls blind tubers. Our read: quarter the clump in your first year, straight down through the stalk, and divide fully once you can spot the eyes. If you store a clump whole, the society's pictorial says to ream out the hollow stem with a screwdriver to avoid rot.
Each piece you keep needs three parts: a body, an unbroken neck and a piece of the crown with at least one eye. The eyes grow only on the crown, the ridge at the top of the neck next to the old stalk; in fall they look like a small swollen bump. The society's step-by-step pictorial shows each part. Oregon State says to remove and discard any tuber with a broken neck first. Penn State's Niezelski finds that necks thinner than a pencil will probably dry out by spring, and the UC Master Gardeners of San Luis Obispo County say a tuber should be larger than your pinky finger or a AAA battery to grow a flowering plant.
Trim off the thin feeder roots, which Penn State says can hold too much moisture, and remove every bit of old stalk, which the American Dahlia Society says promotes crown rot. Most growers throw away the old mother tuber (the one you planted in spring), the society says. For cutting, Oregon State uses a sharp knife and needle-point pruners, and Swan Island a dahlia dividing knife or a linoleum knife; sterilize them between clumps (step 2). Other perennials divide differently; see our guide to dividing perennials. The case for waiting until spring to divide is in the FAQ below.
6. Check every division for rot
Cut a thin slice off the end of each tuber and look at the flesh. The American Dahlia Society says any brown or rusty area in the middle or part of the way out indicates rot: cut back toward the crown to see whether a clear section with the crown remains, and if not, throw the tuber away. Brown or rusty spots inside the crown itself probably mean crown rot, and that tuber is unlikely to keep. The UC Master Gardeners say white flesh is healthy.
A fungicide is optional. Fisher writes that in more than 30 years he found no difference in how well tubers kept with or without a fungicide dip; what matters most is cutting away any sign of fungus. If you use one, Oregon State says to follow all label directions.
7. Dry each division off concrete, then mark it
Let the divisions dry for a day or two in a cool room, or outdoors in the shade if it will stay above 40 degrees F, never on a concrete floor, with each clump's tag kept beside its pieces. Then write the variety on each tuber. (With an indelible pencil you can mark them wet, before drying, as the society does.) The American Dahlia Society allows about 24 hours for small roots and 24 to 36 hours for medium to large ones, and says cement draws moisture out of tubers and makes them shrivel. They are ready when the skin feels dry to the touch and the cuts have begun to callus.
Sources disagree on how long, from about 12 to 24 hours at Swan Island to four or five days for Penn State's Niezelski, whose tubers were more prone to rot after the usual 24 to 48 hours. The UC Master Gardeners give the tradeoff: too much drying causes shrivel, too little causes rot.
For marking, the American Dahlia Society says an indelible pencil works on a slightly wet tuber, while an indelible marker or pen works only on a completely dry one, because the ink spreads on a wet skin. For long names, use a code, and do not lose the code.
8. Pack them in a storage medium or in plastic wrap
Pack each variety in a barely damp medium, in a container that keeps the moisture in, or wrap each tuber in plastic wrap. Most growers use vermiculite in plastic bags, the American Dahlia Society says (coarse works better than fine), with at least as much vermiculite by volume as tubers. Put one variety per bag, and split a large batch of the same variety into two bags, so rot in one does not take them all. In a box or bin, lay the tubers in layers so they do not touch, with medium between the layers; the University of Wisconsin says touching tubers let decay spread from one to the next.
Open or closed is the big argument: some of the society's growers seal their bags and others only twist them, Oregon State says not to close the bag at all, and Swan Island says never to use plastic bags or containers. Our read: start with loosely closed bags or a vented bin, and let your first monthly check tell you which way to adjust. The comparison table below covers each medium.
For plastic wrap, use the Michigan Dahlia Association method on the society's site: tear off a sheet about 20 inches long, roll one tuber in it, lay the next alongside and keep rolling so plastic separates every tuber, fold in the sides near the end, and tape the bundle with masking tape labeled with the variety. The authors wrap up to about five tubers per bundle. Wrap only clean, dry tubers; the society's step-by-step guide warns against wrapping damp ones. Wherever they go, the University of Kentucky says to check that mice have not gotten in. If they have, our mouse repellent guide covers sealing a garage or shed and trapping the mice already inside.
9. Store them cool, dark and above freezing
Find a dark spot that holds steady at about 40 to 45 degrees F and never freezes. The American Dahlia Society says freezing temperatures ruin tubers, while warmer storage encourages the microorganisms and fungus that destroy them and makes tubers sprout and grow feeder roots too soon. Longfield puts the warm limit at about 55 degrees, above which tubers may sprout early or shrivel.
Good places, per the society and the University of Wisconsin: the coldest part of an unfinished basement away from heat sources, an unheated garage that does not freeze, or a root cellar. The temperature and humidity targets below show fifteen sources' ranges.
10. Check them every month
Open the containers once a month, look at every tuber and squeeze a few. The American Dahlia Society says to throw away any tuber that shows signs of rot, and that checking often lets you remove it before the rot spreads to healthy tubers. A healthy tuber is firm and plump, the society's tuber guide says, and should look and feel like a raw sweet potato: not shriveled, not spongy.
| What you find | What it means | What to do |
|---|---|---|
| Soft, mushy or brown tuber | Rot | Remove it; Swan Island cuts rot off to keep it from spreading through the box |
| Wrinkled, shriveled or lightweight tubers | Too dry | Lightly mist the medium, not the tubers (Ohio State, Wisconsin, Swan Island) |
| Condensation inside the bag | Too much moisture | Check for rot, remove any, let the bag air dry before it goes back (Oregon State) |
| Damp medium, or mold on the tubers | Stored too wet | Brush the mold off and move them somewhere drier (UC Master Gardeners); air-dry very damp tubers for a few days and repack in dry material (Wisconsin) |
| Sprouts in storage | Storage too warm, or late winter | Leave them; Swan Island trims sprouts to 1 to 2 inches at planting |
Penn State's Niezelski finds the first month is when too much moisture shows up. To revive a single shriveled favorite, the society's tuber guide suggests a few drops of water in an unsealed plastic bag with the tuber, somewhere warm, while you watch for mold.
11. Wake them up in spring and replant
As spring approaches, move the tubers somewhere warmer so the eyes start to grow: Oregon State uses a spot at 40 to 50 degrees F in March or April, and the American Dahlia Society a warm, dark place at room temperature. Finish dividing any clumps you stored whole once the eyes show.
Plant outside once the danger of frost has passed and the soil stays around 60 degrees F or warmer for several days in a row, as Oregon State advises, or give them a head start in pots indoors 4 to 6 weeks before the last frost date, as Longfield does. If a late cold snap threatens new shoots, our guide to protecting plants from frost covers it.
Which storage method works best?
Short answer: coarse vermiculite in loosely closed bags; plastic wrap if space is tight. No method wins outright, and the dahlia society says they work about equally well when the tubers stay cool and can exchange moisture with the medium.
| Method | Main risk | Who uses or recommends it | Notes, per the sources |
|---|---|---|---|
| Coarse vermiculite, in bags or layered in a bin | Shrivel if the container lets moisture escape | American Dahlia Society (what most of its growers use), University of Kentucky, Oregon State; also listed by Iowa State, UC Master Gardeners, Ohio State, NC State, Cornell and Wisconsin | Coarse works better than fine, the society says; its dust is hard on the lungs. EPA calls using vermiculite in the garden a minimal health risk and says to keep it damp and work in a well ventilated area |
| Wood shavings (pine or cedar pet bedding) | Shrivel | Society beginner guide, Penn State (cedar), Longfield (kiln-dried pine) | Oregon State says shavings tend to cause shriveling, and some society growers say they draw moisture from the roots. Buy the dust-free kind, the society says |
| Peat moss, barely damp | Shrivel if dry, rot if wet | Swan Island (its own farm medium), Longfield, Iowa State, UC Master Gardeners, Ohio State | The society's experienced growers warn against it for that reason. Longfield: no water should come out when you squeeze a handful |
| Sand | Early sprouting; heavy | A Northwest grower cited by the society (slightly moist); NC State (dry) | Tubers sprout and grow feeder roots earlier than in coarse vermiculite, and sand is much heavier, per the society |
| Plastic wrap, no medium | Mold if wrapped damp | Michigan Dahlia Association, WSU Yakima Master Gardeners, Longfield | Some tubers come out blind. The Michigan authors report rot losses of about 3 to 6 percent a year, essentially no shriveling, earlier eyes and much less space |
| Newspaper or paper bags alone | Drying out | Northern Gardener's blog | The society says paper bags may let tubers dry out, and Penn State says paper wicks up too much moisture. brambleandbeyond had its worst results with newspaper alone, in what it says may have been an exceptionally cold winter |
| Perlite | Does not absorb excess moisture | No one here | The society says its dust is also unhealthy to breathe |
Why vermiculite by default: the society says most of its growers use it, and most of the extension sources here list it. Plastic wrap is the space saver, if every tuber goes in clean and dry. Either way, the monthly check tells you whether yours are keeping.
Temperature and humidity targets
Aim for 40 to 45 degrees F, and never let it reach 32. Fifteen of the sources give a storage temperature range:
| Storage temperature | Sources |
|---|---|
| 34 to 40 degrees F | Oregon State |
| 35 to 45 degrees F | Wisconsin, NC State, Cornell, Hennepin County Master Gardeners |
| 40 to 45 degrees F | American Dahlia Society (Fisher, the range most growers recommend), Michigan Dahlia Association |
| 40 to 50 degrees F | American Dahlia Society beginner guide, Penn State (Niezelski's storage area), Iowa State, Ohio State, UC Master Gardeners, WSU, Longfield, Swan Island |
The one temperature inside every range is 40 degrees F (computed from the table). The 40 to 45 target sits inside every range except Oregon State's, whose top is 40. Below 32 degrees F is the hard limit: Longfield says the cells rupture and the tubers turn to mush when they thaw.
Humidity is where the sources split widest: about 50 percent (Wisconsin, Ohio State), about 70 percent (UC Master Gardeners), about 80 to 90 percent (Longfield) and 93 to 95 percent (Swan Island, which calls it difficult to obtain). A room reading also is not what the tubers feel inside a bag or a box of damp medium; Longfield says the packing material and container do most of the work. Our read: use a thermometer-hygrometer to catch the cold and warm spells, and judge moisture by the tubers themselves at each monthly check. Firm is right, wrinkled means add moisture, and mold or soft spots mean take it away.
How long can they stay in storage? Longfield says six to seven months is typical and that well stored tubers can stay viable for up to eight or nine months; Swan Island says dahlias need at least 3 months of rest between seasons.
Tools for this job
Six things this guide reaches for, from lifting the clump to the monthly check. The spade cuts the circle around the clump, the knife and snips divide it, and the vermiculite, marker and thermometer-hygrometer cover packing, labeling and storage.

Spear Head Spade 40 inch D-Handle Garden Spade
Our 40 inch D-grip spade for cutting the circle a foot or more out from the stalk before you lift the clump from underneath: the double-patented blade is pre-sharpened from tip to tail, so its edges cut the roots they cross.
PVP Industries Horticultural Coarse Vermiculite
Coarse vermiculite, the grade the American Dahlia Society says works better than fine for storing tubers in bags, with at least as much vermiculite as tubers by volume; keep it damp and work in a well ventilated spot to hold down dust, as EPA advises.
Check price on AmazonA curved blade that cuts on the pull, the kind of knife Swan Island names for dividing clumps.
Check price on AmazonFiskars Micro-Tip Pruning Snips, 6 inch
Snips whose micro-tip blades cut all the way to the tip, for trimming feeder roots and working between tubers; Oregon State divides with a sharp knife and needle-point pruners.
Check price on AmazonTempPro TP50 Digital Thermometer Hygrometer
Shows temperature and humidity with high and low records, so each monthly check tells you whether the storage spot has stayed near the 40 to 45 degree F target and above freezing.
Check price on AmazonStaedtler Garden Marker Pen, 2 Pack
A waterproof, lightfast permanent marker for writing the variety on each tuber once it is completely dry (the American Dahlia Society says pens work only then), and on bags and tags.
Check price on AmazonCommon questions
Can you leave dahlias in the ground over winter?
In USDA Zone 8 and warmer, usually yes, in soil that drains well and under a thick mulch. Oregon State extends that to Zone 7, and NC State's plant page says so in one place and says to dig in Zone 7 in another; Longfield says Zone 7 gardeners should lift and store, and WSU says many Zone 7 gardeners succeed with extra protection. Swan Island says that if the ground freezes 4 or more inches deep, leaving them in is not an option.
Should you divide dahlia tubers in fall or spring?
Either works. Fall clumps are easier to cut, the American Dahlia Society says, but the eyes are harder to find. The University of Wisconsin says it is best to wait until spring, because any cut increases the chance of rot in storage, and Swan Island notes that spring clumps cut more like leather, but the eyes are easier to identify. The common compromise is to cut the clump into halves or quarters in fall and finish dividing in spring; if you store a clump whole, the society's step-by-step guide says to ream out the hollow stem with a screwdriver to avoid rot.
Is peat moss good for storing dahlia tubers?
Growers disagree. Swan Island recommends slightly damp peat moss and uses it on its own farm, and several extension services list it. The American Dahlia Society says experienced growers warn against it, because dry peat tends to shrivel tubers and moist peat tends to promote rot. If you use it, keep it barely damp and check monthly.
Can you store dahlia tubers in the refrigerator?
Longfield says it is generally not recommended: most refrigerators have very low humidity, and ripening fruit such as apples or pears gives off ethylene gas, which can make tubers rot or fail to sprout. Swan Island says growers in climates that stay hot all year, such as Florida, should store theirs in a cooler or refrigerator for at least 90 days, at 40 to 50 degrees. The American Dahlia Society describes one grower who used an unplugged refrigerator cooled by a gallon jug of ice changed every few weeks.
Why are my stored dahlia tubers shriveling?
They are losing moisture, from a medium that is too dry, a container that lets moisture escape, or too long drying before storage, especially on concrete. Lightly mist the medium, not the tubers, and check again in a few weeks.
Why did my dahlia tubers rot in storage?
Usually too much moisture or too much warmth. The American Dahlia Society's beginner guide says fungus usually means the tubers were too wet when stored, and the society says warm storage encourages the fungus that destroys tubers and that old stalk left on the crown promotes crown rot. Remove rotting tubers as soon as you find them.
The bottom line
Label before frost, dig wide and lift from underneath, divide or quarter the clumps, dry them a day or two off concrete, pack each variety in barely damp coarse vermiculite or in plastic wrap, and keep them dark at about 40 to 45 degrees F. Then open the boxes once a month. While the tubers rest, fall is the time to plant next spring's bulbs: our list of bulbs to plant in fall and our bulb planter guide cover them.
We are Spear Head Spade, and what we make is digging tools: double-patented spades, with over 600,000 sold. Our 40 inch D-Handle spade is the one we make for cutting the circle a foot or more out from the stalk before you lift the clump; its pointed blade is pre-sharpened from tip to tail.
Disclosure: some links in this guide are affiliate links to Amazon. This is at no extra cost to you, and it never changes our honest, use-based recommendations.